


Installing a gate wheel with an electric sliding gate motor is a task that requires careful planning, the right tools, and a good understanding of the process. As a supplier of Electric Sliding Gate Motors, I've seen firsthand the importance of a proper installation to ensure the smooth and safe operation of your gate. In this blog, I'll guide you through the steps of installing a gate wheel with an electric sliding gate motor.
Step 1: Gather the Necessary Tools and Materials
Before you start the installation process, you need to gather all the tools and materials you'll need. Here's a list of the essentials:
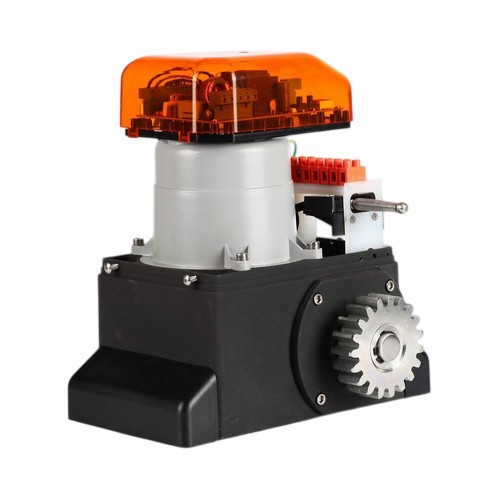

- Electric sliding gate motor (such as our Heavy Duty Automatic Gate Opener or Remote Control Sliding Gate Motor)
- Gate wheel
- Wrenches
- Screwdrivers
- Drill
- Measuring tape
- Level
- Safety goggles and gloves
Step 2: Prepare the Gate
The first step in installing the gate wheel is to prepare the gate. This involves cleaning the area where the gate wheel will be installed and ensuring that the gate is in good condition. Check for any damage or wear and tear that could affect the installation or the performance of the gate.
- Clean the Gate: Use a brush or a cloth to remove any dirt, debris, or rust from the area where the gate wheel will be installed. This will ensure a clean surface for the installation and prevent any interference with the operation of the gate wheel.
- Inspect the Gate: Check the gate for any signs of damage, such as cracks, dents, or loose parts. If you find any issues, repair them before proceeding with the installation. This will ensure the safety and stability of the gate.
Step 3: Measure and Mark the Installation Location
Once the gate is prepared, you need to measure and mark the installation location for the gate wheel. This is a crucial step, as the correct placement of the gate wheel is essential for the smooth operation of the gate.
- Measure the Gate: Use a measuring tape to measure the width and height of the gate. This will help you determine the appropriate location for the gate wheel.
- Mark the Installation Location: Based on the measurements, mark the installation location for the gate wheel on the gate. Use a level to ensure that the marks are straight and level.
Step 4: Install the Gate Wheel
Now that you have marked the installation location, it's time to install the gate wheel. This involves drilling holes in the gate and attaching the gate wheel using the appropriate hardware.
- Drill Holes: Use a drill to drill holes in the gate at the marked installation location. Make sure the holes are the correct size for the bolts or screws that will be used to attach the gate wheel.
- Attach the Gate Wheel: Place the gate wheel over the holes and insert the bolts or screws through the holes in the gate wheel and into the gate. Tighten the bolts or screws using a wrench or a screwdriver. Make sure the gate wheel is securely attached to the gate.
Step 5: Install the Electric Sliding Gate Motor
After installing the gate wheel, the next step is to install the electric sliding gate motor. This involves mounting the motor on the gate and connecting it to the power supply.
- Mount the Motor: Use the mounting brackets provided with the motor to mount the motor on the gate. Make sure the motor is securely attached to the gate and that it is level.
- Connect the Power Supply: Follow the manufacturer's instructions to connect the motor to the power supply. This may involve wiring the motor to a power outlet or a control panel. Make sure all the connections are secure and that there are no loose wires.
Step 6: Test the Gate
Once the gate wheel and the electric sliding gate motor are installed, it's time to test the gate. This involves opening and closing the gate to ensure that it operates smoothly and that the gate wheel and the motor are working properly.
- Test the Gate Operation: Use the remote control or the control panel to open and close the gate. Observe the gate as it moves and make sure it moves smoothly and without any hesitation.
- Check for Alignment: Check the alignment of the gate wheel and the motor to ensure that they are working together properly. If you notice any issues, such as the gate not closing completely or the motor making unusual noises, adjust the alignment or the settings of the motor.
Step 7: Adjust and Fine-Tune the Installation
After testing the gate, you may need to make some adjustments and fine-tuning to ensure the optimal performance of the gate. This may involve adjusting the tension of the gate wheel, the speed of the motor, or the sensitivity of the safety sensors.
- Adjust the Gate Wheel Tension: If the gate wheel is too loose or too tight, it can affect the operation of the gate. Use the adjustment screws on the gate wheel to adjust the tension until the gate moves smoothly.
- Adjust the Motor Speed: The speed of the motor can be adjusted to suit your needs. Use the control panel or the remote control to adjust the speed of the motor until the gate opens and closes at the desired speed.
- Test the Safety Sensors: Most electric sliding gate motors are equipped with safety sensors that detect obstacles and stop the gate from closing if an object is detected. Test the safety sensors by placing an object in the path of the gate and observing how the gate responds.
Step 8: Maintain the Gate and the Motor
Once the installation is complete and the gate is working properly, it's important to maintain the gate and the motor to ensure their long-term performance and reliability. This involves regular cleaning, lubrication, and inspection of the gate and the motor.
- Clean the Gate and the Motor: Regularly clean the gate and the motor to remove any dirt, debris, or rust. This will prevent any damage to the gate and the motor and ensure their smooth operation.
- Lubricate the Moving Parts: Apply lubricant to the moving parts of the gate and the motor, such as the gate wheel, the motor gears, and the rollers. This will reduce friction and wear and tear and extend the lifespan of the gate and the motor.
- Inspect the Gate and the Motor: Regularly inspect the gate and the motor for any signs of damage, wear and tear, or malfunction. If you notice any issues, repair them immediately to prevent further damage or safety hazards.
Conclusion
Installing a gate wheel with an electric sliding gate motor is a complex task that requires careful planning, the right tools, and a good understanding of the process. By following the steps outlined in this blog, you can ensure a successful installation and the smooth and safe operation of your gate.
If you have any questions or need further assistance with the installation of a gate wheel with an electric sliding gate motor, please don't hesitate to contact us. As a leading supplier of Electric Sliding Gate Motors, we have the expertise and the experience to help you with all your gate installation needs. Whether you're looking for a Heavy Duty Automatic Gate Opener, a Remote Control Sliding Gate Motor, or a Sliding Gate with Remote Control, we have the right solution for you.
Contact us today to discuss your requirements and get a free quote. We look forward to working with you!
References
- "Electric Sliding Gate Motor Installation Guide" - Manufacturer's Manual
- "Gate Maintenance and Repair Handbook" - Industry Publication


